Blu Tack is clever stuff, a multi-purpose, reusable, putty-like adhesive that is a top choice for students and office workers. But when it’s time to move on, how do you get Blu Tack off your walls?
Blu Tack can last up to five years. Its adhesive properties actually increase over time, which is why older Blu Tack can be challenging to remove. It stains too, which can lead to claims for repair from your letting agency.
Luckily there are many tried and tested methods. All is not lost, even when the adhesive has come off and left a stain.
Here are some simple methods to get your walls to look good again.
Nine Ways to Get Blu Tack Off Your Walls
Use Blu Tack to Get Blu Tack Off Your Walls
You read that right! You can use the adhesive qualities of a new, clean piece of Blu Tack to lift off any stubborn pieces.
Roll it between your fingers into a ball shape, then, with a slow circling motion gently dab at the Blu Tack until it is absorbed into the fresh piece.
If your Blu tack is still just a few months old it may not even leave a mark, and it can probably go on to be reused.
Top Tip:
Recently decorated walls are most at risk from Blu Tack stains. Emulsion paint goes on drying for weeks after it is applied, which makes it more absorbent, and more likely to sustain damage.
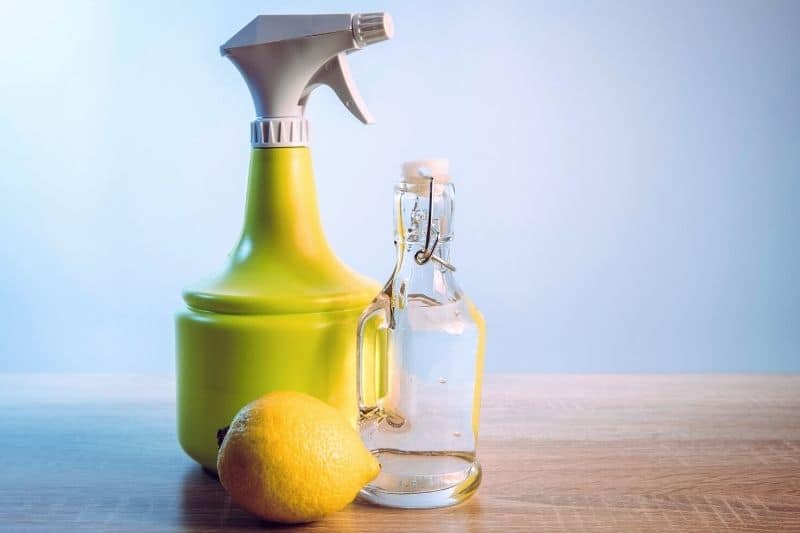
Get Blu Tack Off Your Walls With White Vinegar
The cleaning kudos of white vinegar is renowned. Also known as acetic acid, white vinegar is a good natural, and non-toxic cleaning medium that won’t affect the emulsion paint on your walls.
Lightly soak the affected area with a cloth or a cotton bud. Don’t use too much, as you want to avoid runs.
Let it rest for five minutes before wiping off the white vinegar gently with a clean, dry cloth, or a paper towel.
Top Tip:
Never use Blu Tack on wallpapered walls. Torn wallpaper is often impossible to repair.
Use Citrus or Lemon-Based Cleaner
Here’s one for the mixers, the makers, the cocktail shakers! Take a tablespoon of white vinegar, the same amount of lemon juice, half a cup of warm water, a pinch of salt and a small squirt of washing-up liquid, or hand soap.
Stir it all together and you’ve got a non-toxic, safe solution that can be used anywhere. The cool part is that the lemon helps to cancel out any vinegar smell.
Apply with a soft cloth or a sponge. This method is particularly effective on stubborn, hard-to-shift stains as it dissolves any residue left behind by the Blu tack.
Top Tip:
Blu Tack is perfect for use on non-porous surfaces such as glass, metal, and plastic laminate i.e. flat-pack IKEA-style furniture, or high-sheen painted surfaces.
Invest in a Magic Melamine Dirt Erasing Sponge
A melamine sponge is a great piece of fabric tech that should be in everyone’s cleaning tool kit. Marketed as a Magic Eraser, it can shift most stains on its own.
If you are struggling with Blu Tack residue, then reach for a melamine sponge. Lightly wet it, wipe the area, wait a little while, then repeat.
It just takes a little time to wet, wipe, wait, repeat. Before you know it, the stain will have disappeared!
Top Tip:
The alternative product White Tack also leaves behind stains. The stain is produced by the ingredient that makes the putty-like adhesive malleable and has nothing to do with its colour.
Use a Hairdryer to Get That Blu Tack Off your Walls
Now we’re talking about bringing out the big guns. Blu Tack can harden off after years of holding up those epic posters on your walls.
Some folks recommend a heat gun, the kind you’d use to strip gloss paint off wood. These are far too strong. The level of heat generated would cause far more damage than a little bit of Blu Tack ever could.
It is important to use a hair dryer on a low setting to soften up any hardened Blu Tack. Often it is the only way to get things moving! The Blu Tack should quickly soften and will come off with light pressure from your fingertips.
Top Tip:
Never use Blu Tack on brickwork. Bricks are highly absorbent and will soak up the oily residue left by Blu Tack and the stain will remain forever.
Chewing Gum Remover
You’re thinking that things are getting serious right now. For chewing gum remover to be an option there must be a lot of Blu Tack staining on your walls. These products are extremely effective adhesive dissolvers and make short work of Blu tack. 6
Use little and dab sparingly over the affected area. It will dissolve the Blu Tack very quickly but could damage a painted surface if you are too liberal with its application.
Blot it off with a dry cloth. Be gentle for the best results!
Top Tip:
Blu Tack damage is not on the list as reasonable wear and tear in a rental property or in student accommodation. Your rental deposit may be put at risk by Blu Tack stains.
Can You Really Use Lighter Fuel to Get Blu Tack Off Your Walls?
The answer might surprise you, but it is what the maker of Blu Tack, the adhesive manufacturer Bostik, recommends. It does seem an extreme choice for a minor cleaning operation, but if they say lighter fuel works, then so be it.
Bostik says to use a small amount on a cotton wool pad and to dab lightly in a circular motion until all the adhesive residue is dissolved.
Lighter fuel will evaporate quickly, and it may make the room smell, so open a window to ensure decent ventilation. Also, do not use it near naked flames!
Top Tip:
Instead of Blu Tack, it might be worth picking up a noticeboard at your local office supplies shop for all of those temporary reminders, postcards, and timetables. Alternatively, you could invest in some magnets and attach pictures, notes, and flyers to your fridge.
Use WD-40 All Purpose Oil to Get Blu Tack Off Your Walls
WD-40 is one of those tool kit items your handy best mate swears by. It comes in a blue spray can and is at home in sheds, garages and under kitchen sinks.
Spray a little onto that stubborn stain and watch it vanish in seconds. Blot off the WD-40 with a soft cloth or a dry paper towel.
WD-40 will dissolve most adhesives, it’s famous for getting things moving, so take care not to overspray.
Top Tip:
On day one, when you move into a student or rental property, take time-stamped photographs of all the walls in the space that you are responsible for. When the time comes for you to leave it will serve as a useful record for the condition of the property when you arrived.
Sand and Repaint
Sometimes this is the cleaning method of last resort. If your rental deposit is at risk, then this might just save the day.
Lightly sand the affected areas. Clean off the surface. Remove any dust, then gently touch in with matching paint.
Check the shed, the under-sink, or under-stairs cupboards for any leftover paint. Visit the local DIY store and pick up a tester pot. Sometimes they come with a built-in brush to make your life easier!